How to make home-made photo cupcakes
Wednesday, August 20, 2014
I was invited on a weekend to Carlingford to celebrate my good friend, Marc’s birthday. I was speaking to his lovely niece, Shauna about arrangements and offered to make the birthday cake. As I was making the offer, I heard myself say the words “why don’t I make cupcakes? I could put his face on […]
I was invited on a weekend to Carlingford to celebrate my good friend, Marc’s birthday. I was speaking to his lovely niece, Shauna about arrangements and offered to make the birthday cake. As I was making the offer, I heard myself say the words “why don’t I make cupcakes? I could put his face on them!” I am not sure what on earth I was thinking of- I have never made a cupcake in my life, I don’t particularly like them and I certainly didn’t have the first clue how to put his face on them!
All the same, I have never backed away from a challenge so this was not the time to start. Basically, a cup cake is just a jumped up fairy cake and I have been making those since I was a child so that’s where I started.
With regards to the photo toppers, I discovered that you can order these on line- you provide a photo and they send a sheet of the toppers. However, I was keen to have lots of different photos of Marc so decided to give this a go myself.
I decided that printable rice paper was the way to go and ordered some online. I did have a little concern that my printer wouldn’t be able to cope with anything other than standard A4 but it coped just fine.
I collated lots of photos of Marc (mostly by stalking his Facebook page) and put them in a word document, shaping them into circles and creating coloured borders. I printed this onto the rice paper and used scissors to cut out the circles and set to one side.
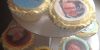
I then made the cupcakes (recipe and instructions below) and topped with buttercream that I piped on. I then set the rice paper toppers on top of the buttercream, pressing down slightly to make sure that the toppers stayed put.
I have to say that not only did the cupcakes look great but they tasted delicious. Best of all, the birthday boy was delighted with them and took great pleasure in eating his own face!
To make the actual cupcakes you will need:
Ingredients:
- 4oz butter (softened)
- 4oz caster sugar
- 2 eggs
- 1 tsp vanilla essence
- 4 oz self-raising flour
- 2-3 tblsp milk
For the buttercream
- 5 oz butter (softened)
- 10 oz icing sugar
- 2 tblsp milk
Instructions:
- Preheat the oven to 180C/350F/Gas 4 and line a 12-hole muffin tin with paper cases.
- Cream the butter and sugar together in a bowl until the mixture is pale and creamy.
- Beat in the eggs a little at a time and stir in the vanilla essence.
- Mix in the flour, adding a little milk until the mixture is of a dropping consistency. Spoon the mixture into the paper cases until they are half full.
- Bake in the oven for 10-15 minutes, or until golden-brown on top. A skewer inserted into one of the cakes should come out clean if they are cooked. Allow to cool for 10 minutes, then remove from the tin and cool on a wire rack (make sure they are totally cold or the icing will melt).
- To make the buttercream icing, beat the butter in a bowl until soft. Add the icing sugar and beat until smooth. Add some milk until the texture is creamy.
- Put the icing into a piping bag with a star nozzle and pipe onto the cup cakes in a circular swirl.
- Top with the rice paper toppers
- Serve and enjoy


What Do You Think?
Recommend this content to other Eating Ideas readers by giving it a thumbs up!
Or why not tell us what you think by leaving a comment?
I really want to give these a go- they look easy to make
Thanks Helen they are fun to make!
I love these!
Thanks Sarah- give them a try!